
DIY: Halloween Paper-Maché Piñatas
HOW TO MAKE A HALLOWEEN PAPER-MACHÉ PIÑATA
In the studio with Hilltown Families Guest Artist, Kara Kitchen
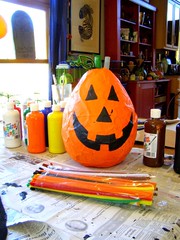
Halloween Pinata (Photo credit: Sienna Wildfield)
The history of piñatas is rich, with historical traditions found in China, Europe, and Mexico, and are made out of a variety of materials, including clay pots, tissue paper, ribbons and paper-maché. In Mexico, piñatas were originally clay pots filled with sweets and treasures, later transformed into a seven-point star with religious symbolism. In today’s modern world, piñatas come in a menagerie of traditional and commercial characters and icons.
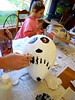
Families gathered to make paper-maché piñatas with balloons for Halloween (click here to see more photos). In this two-day workshop kids made paper-maché piñatas the shape of traditional Halloween icons, including a carved pumpkin, a skull and cross-bones, and a black bat. And one child made a kangaroo piñata to use at her birthday next summer.
HOW TO MAKE A PAPER-MACHÉ PIÑATA
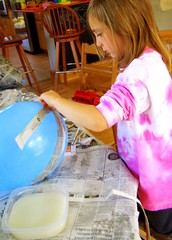
Making a paper-mache pinata. (Photo credit: Sienna Wildfield)
Making a paper-maché piñata is a two-step process. The first is to create a hollow paper-maché animal or shape and then allow it to dry. The second is to glue, paint and tie it all together.
STEP ONE: PAPER-MACHÉ
Gather your supplies. You’ll need:
- White flour and water (wheat-paste)
- Large plastic bowl
- Newspaper strips
- Balloon
- Large drinking glass
- Tape
- String
 First make your wheat-paste. The recipe is simple: Combine one part white flour with two parts water in a large plastic container, adjusting amounts to get the right paste-like consistency. Mix well until all the lumps of flour are gone. If you store the paste, add a few tablespoons of salt. We discovered later, after the lid blew-off, that wheat-paste doesn’t keep for a week otherwise.
- Prepare newspaper strips by folding a newspaper in half and tear into strips. Then, unfold the strips and tear in half. Make enough strips to cover the surface of your balloon twice, at least.
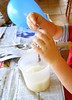
- Blow up a large balloon. Place the tied end into the opening of a large drinking glass to hold it
 up-right while adding paper-maché strips.
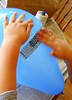
 - To add paper-maché strips of newspaper to your balloon, dip strips into the paste and then squeeze off the excess with your fingers. Add enough layers of paper-maché strips so the color of the balloon is not visible through the newspaper.
- Tie string to the top of the balloon and hang until completely dry.
STEP TWO: MAKE YOUR DESIGN
Making a kangaroo paper-maché pinata. (Photo credit: Sienna Wildfield)
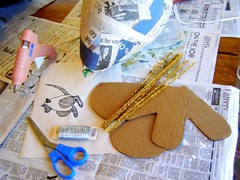
Gather your supplies. Depending on what you’re making, your supplies may vary. To make any of the designs we chose, you will need the following:
- Paper & pencil
- Tempera paint
- Small sponge brushes
- Glue gun
- Old button down
- Hair dryer
- Cardboard
- Scissors
- Pipe cleaners
- Twine
- Matte finish spray
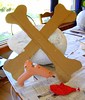
 First draw out your design to determine the cardboard cut-outs needed. For a kangaroo we needed to cut out legs, a tail, face and ears. The bat needed a pair of wings and the skull and cross-bones needed two bone cut-outs. The classic Halloween Jack-O-Lantern was the simplest of the four designs.
- Once you have your design, use the edge of your balloon to trace the curve of the balloon into your cut-out template, then cut out your pieces.
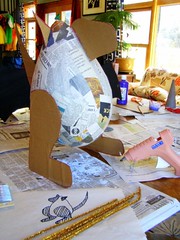
 Cover your surface with newspaper and warm up your hot glue gun. Gluing the card board pieces to the balloon is for adults to manage. The glue is way too hot to let the young ones use. Ask any of the adults who got hot glue on their hands during this process. Ouch!
- The glue dries pretty quickly, so just hold steady with your cut-out while waiting for it to adhere. Add any extra glue if needed. Note: The glue will not adhere to a wet paint surface, so make sure everything is well glued on during this step to avoid ears or wings falling off during the painting process.
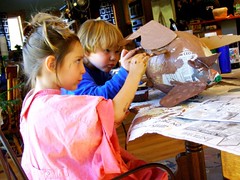
 Now the fun begins. Get your vats of paint ready with small sponge paint brushes for each color and put those old button-down shirts on the kids, backwards. They make great smocks. Once your child has put a base coat on, go over again to smooth out the paint and patch up and missed spots.
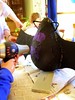 Use the hair dryer to speed up the drying process. Paint and glue on any details. Use pipe cleaners for eyes, leaves, ears or even a pouch.
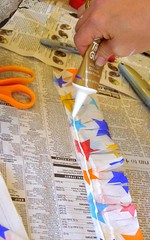
TISSUE FRINGED PAPER-MACHÉ PIÑATA
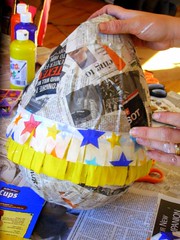
 Another decorative option is to cover your unpainted paper-maché piñata with fringed tissue paper as illustrated in the pictures below. We used recycled tissue paper saved from last year’s holiday season. These fringed piñatas look like colorful eggs and would make great Springtime decorations.
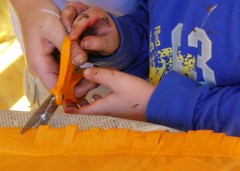
- Fold strips of tissue paper in half and seal with a line of paper glue.
- Cut fringe just 1/2-inch shy of glue line.
- Place another line of glue on your strip of tissue paper.
- Adhere to your paper-maché piñata, repeating with another layer just above, slightly overlapping.
[Photo credits: Sienna Wildfield]
 Kara Kitchen is a public high school art teacher with a BFA from Mass Art and MEd from Lesley University, currently offering art workshops and individual instructions at her barn art studio. She is a mother of twins and lives with her husband in Plainfield, MA.


I am very impressed with reading and seeing your class.I would like to learn more about making different shapes colors and designs.
Thanks!
We are belting off 20 of these to use in our Halloween Festival here in Suwon, South Korea!
I’ll still miss the real things from back home in Scituate, MA.
me and my girls make a huge paper mache pumpkin every year with the large shacker balloons/punch balloons we have just started ours for this year click on url to see it, we are going to do a bat too.
this looks great, cant wait to try it
My Grandchildren want to use paper mache to make Christmas ornaments and gifts for their parents. Thanks for the directions. They are easy to follow and right to the point. Thanks linda
Thank you. This is simple and well written. I am going to do this with my Boys and Girls Club today in preparation for Cinco de Mayo.
Thank you for posting this. I recommeded it to my 4th grade students to reference for ideas on a cultural history/art project they have been assigned. – Greetings to all the students from Mr. Bernstein’s class!